Last Updated on November 2, 2021
Are you tired of hammering nails? I definitely am. Swinging a hammer again and again upon a nail does take a lot of time, not to mention the cramp it leaves in your arm after hours of work.
Do you feel bone-tired after a day-long of nailing on your project? Then it is time for you to leave that hammer and replace it with a palm nailer. If you are wondering what a palm nailer is, that’s okay. Because it is comparatively a new concept.
Here, I will tell you everything you need to know about how to use a palm nailer. And after you’ve gone through the whole article, trust me, you will operate the tool like a pro!
Contents
What Actually Is a Palm Nailer?
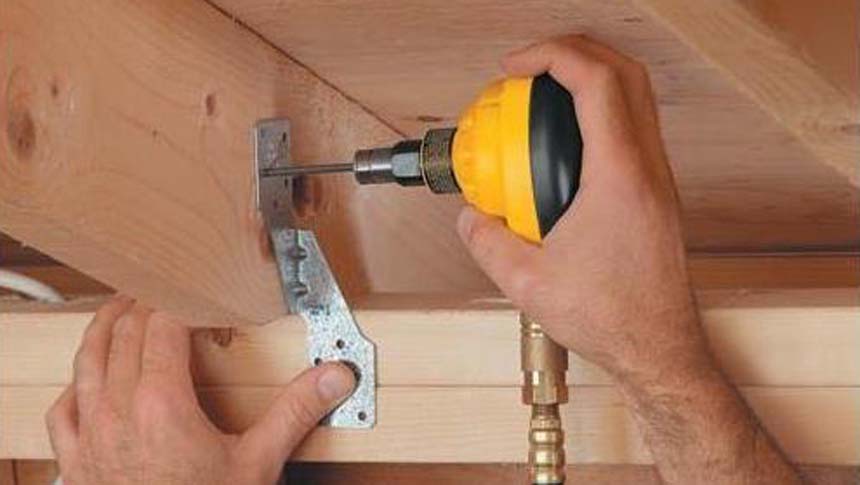
The name itself states what it is. A palm nailer is like a nail gun, except that it fits right within your palm. Expand your fingers and enclasp it by its surface. Yup, you use it that way! The mechanism of a palm nailer is similar to that of a nail gun.
It uses energy from an air compressor or battery to forcefully thrust a nail while you relaxingly hold it over the point you want to put that nail on. The nails can be implanted into any flat surface like wood or wall. However, a palm nailer is less powerful than typical nail guns.
Nail guns are heavy, and it takes some time to learn to use it properly, whereas palm nailers are much more lightweight, smaller, and easier to use.
Nail guns generally use strip and coil nails that we shoot from within the gun. These coil nails are expensive too. On the other hand, palm nailers normally use regular nails we use with a hammer, and they can be found in any hardware store.
Why Should I Use a Palm Nailer?
Here are a few reasons why you should use a palm nailer:
Pain-Free and Less Time-Consuming
Using a hammer is time-consuming, not to say the risk it comes with. Let the hammer miss it for once; your fingers will freeze in pain. If you swing it regularly and for a long time, well, then the ache is not new for you. On the other hand, the palm nailer eliminates all the risks. Use it for the whole day; you won’t feel any pain.
Precise
When you use a hammer, there are good chances of the nail going awry and sometimes causing damage to the surface. Palm nailer is effective in this case; it will push the nails directly where you want. The hammer is hard to be swung over tight spots, corners, or ceilings. Palm nailers can reach even the narrowest corner easily.
Easy to Use
An alternative for palm nailer is a nail gun. But a lot of people don’t find it convenient as well. Nail guns are heavy, and wielding it for a long time may also give you fatigue. And because these guns are bulky, you cannot always reach tight spaces.
Whereas, palm nailers are light, and you can use it without costing much of your energy. There will be no exhaustion at all!
Varieties
A variety of palm nailer models come with different features. There are pneumatic ones that have to be attached to the air compressor. Then there are cordless and battery-run palm nailers, which are highly portable.
You can just charge and change the battery over time and use them for a long time. However, pneumatic nailers are more powerful.
Nails
Most of the models of palm nailers can drive nails of 1.5” to 3.5” length. Again, powerful models can drive nails up to 6” long. Those are useful for big projects.
Additional Features
Some nailers have additional features like LED lights, depth-of-drive adjustments, magnetic nail alignment systems, etc.
How to Use a Palm Nailer?
Using a palm nailer is the simplest thing to do. Give it a few try the way I tell you, and you’ll be operating it like you’ve been doing this for years! Follow these easy steps to literally nail it:
Step 1
Put your earmuffs on and wear hand gloves if you are going to work for a long time. Palm nailers are loud, and you don’t want to damage your ear. Also, it vibrates when you start. So, hand gloves might help you in retaining a steady pressure.
Step 2
If there is a strap, slide your hand inside and take a firm grip. Adjust the depth of the nose according to the length of the nail you will use if your nailer has that feature.
Step 3
Take the nail you are going to use and adjust it through the open nose. Place the flat end inside the nose, leaving the sharp end out. If the nose is magnetic, it will tug the nail, and you won’t have to hold it there.
Step 4
Place the sharp end exactly on the point you will drive the nail. Now try to keep the nail straight and steady over the point. Otherwise, it will go awry. Especially if you are nailing horizontally or upwards, put soft pressure to keep it straight.
Step 5
Give it thrust and broom! The nail will drive down within less than a second.
Step 6
If you’re willing to leave a little portion off at the top for hanging purpose or whatsoever, quickly remove the pressure before it goes all the way down. You have to be really quick in this case.
And you are done. Yes, exactly! It’s that easy. Now let’s repeat the process a few times more just to become used to the process. And then you are ready to work like a professional.
To maintain your palm nailer for a long time, you can oil the nose every now and then. Keep the nailer covered; almost all the new models are provided with dust covers for them. It will give you years of service.
Conclusion
Palm nailers will save you a lot of time and work. Although for framing and hard projects, nail guns appear to be more viable, the newer models of palm nailers are also adapting to become more efficient. You can now do almost every type of work regarding nailing with a good palm nailer.
So, if you don’t own one yet, what are you waiting for? Go buy one today and rock!
Related Guides: